
Terraforming an AWS VPC Part 3
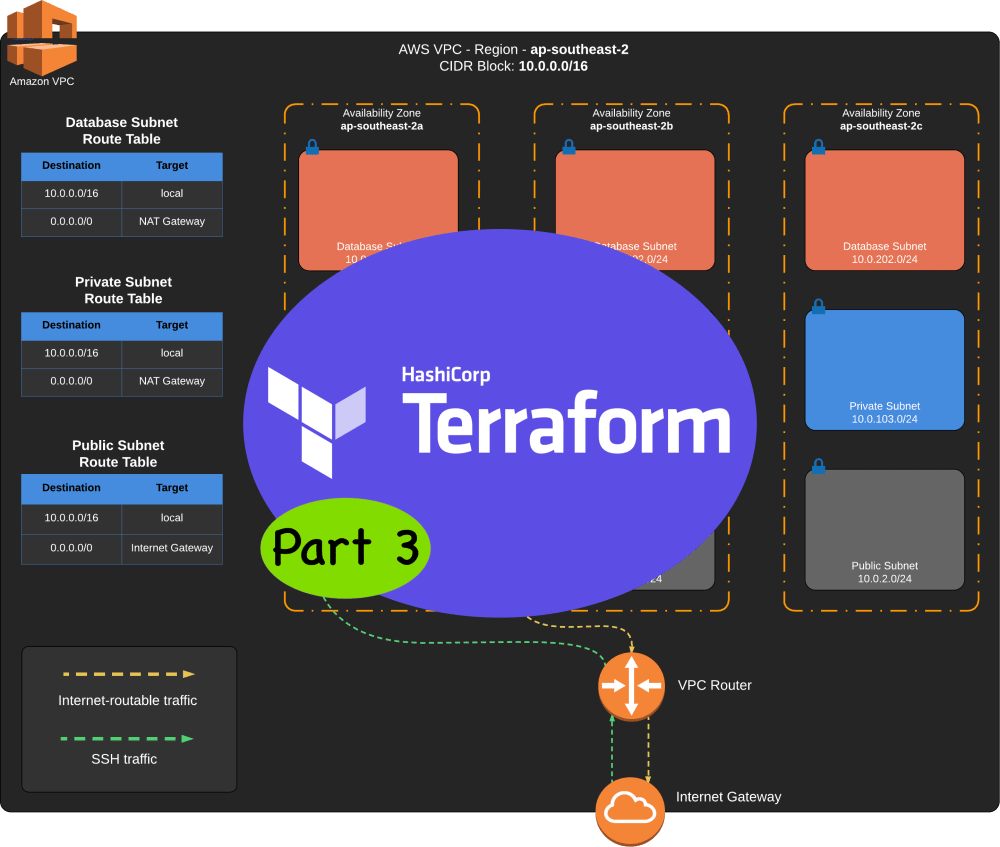
Table of Contents
This is the third part of a series of articles on how to set up an AWS VPC using Terraform version 0.12.29.
We have created our first Terraform project in Part 1 and had our introduction
to remote state files and workspaces in Part 2. In this post,
we will finish creating our VPC by adding these resources:
- AWS VPC (done)
- Internet Gateway
- 3x Public subnet — one for each AZ
- 3x Private subnet — one for each AZ
- 3x Database subnet — one for each AZ
- Public subnet route table
- Private subnet route table
- Database subnet route table
- EC2 Bastion Host
- Elastic IP Address
- NAT Gateway
The instructions here is the hard way of doing it! We will add each AWS resource one by one to get you acquainted with Terraform. An easier way to create a VPC is using a third party Terraform AWS VPC module which we will cover in the next and final post of the series.
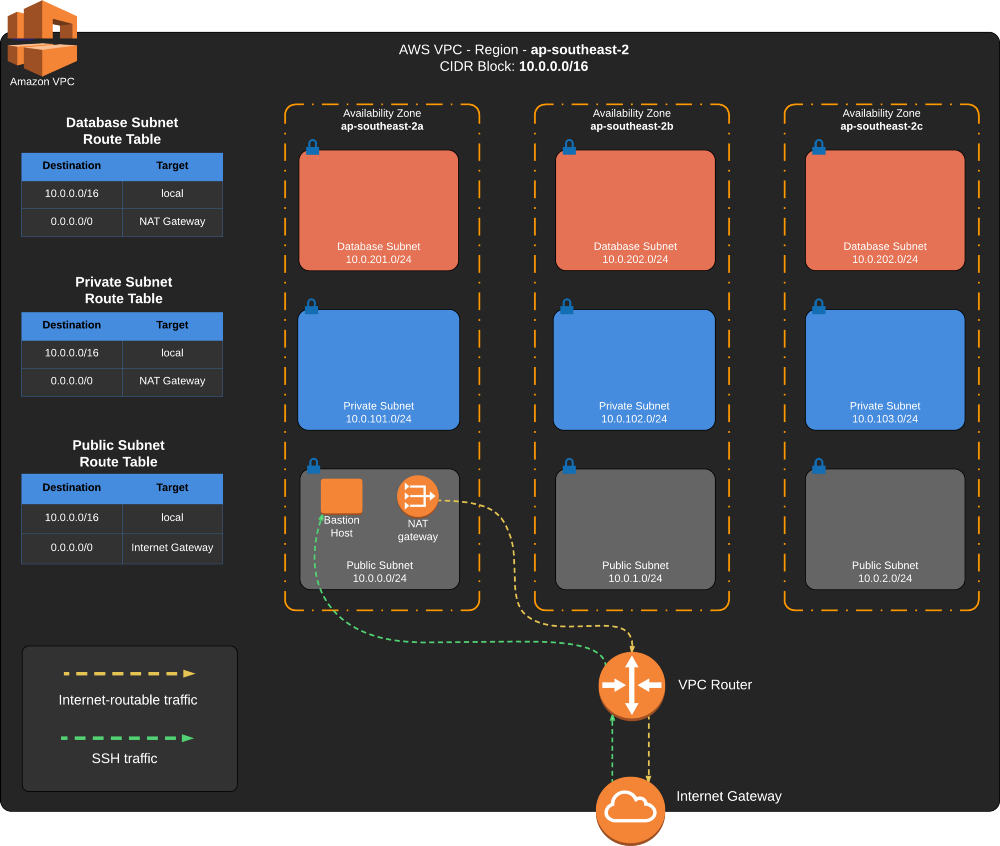
VPC Diagram
The diagram below is to help you visualize what we will create.
Provisioning AWS Resources
The AWS on-demand resources we will be provisioning in this section will incur cost. Make sure you terminate all resources
when you are done. You can do it manually or by running terraform destroy
Updating the VPC
Switch to the DEV workspace.
$ terraform workspace select dev
$ terraform workspace list
Open main.tf, this is where we will add all the VPC Terraform resources. After each section, we will run terraform apply
to do incremental updates to our VPC.
#-------------------------------
# Internet Gateway
#-------------------------------
resource "aws_internet_gateway" "gw" {
  vpc_id = aws_vpc.main.id

  tags = {
    Name = "my-internet-gateway-${terraform.workspace}"
  }
}
This will open communication from our VPC to the internet. Apply the change.
$ terraform apply -var-file=env/dev/vpc.tfvarsWe will create three subnets (public, private, database subnet) for each Availability Zones.
There are 3 AZs for the Sydney Region defined in our DEV workspace. Giving us a total of 9 subnets.
Terraform uses input variables to make the script
more flexible and sharable. We will create the variables and set the values in the DEV workspace.
This will allow us to re-use the Terraform scripts to provision multiple environments.
Open variables.tf and add the map variable declarations below. These will be set to the AZ values distinct to each
workspace. Remember that in Part 1 we set each environment to use different
AWS regions.
#-------------------------------
# Variables
#-------------------------------
variable "az_public_subnet" {
  type = map(string)
}

variable "az_private_subnet" {
  type = map(string)
}

variable "az_database_subnet" {
  type = map(string)
}
Now the customization part, open the file env/dev/vpc.tfvars and set the key-value pairs for the DEV workspace.
These are the CIDR blocks assigned to each subnet as shown in the diagram above.
az_public_subnet   = { "ap-southeast-2a" : "10.0.0.0/24", "ap-southeast-2b" : "10.0.1.0/24", "ap-southeast-2c" : "10.0.2.0/24" }
az_private_subnet  = { "ap-southeast-2a" : "10.0.101.0/24", "ap-southeast-2b" : "10.0.102.0/24", "ap-southeast-2c" : "10.0.103.0/24" }
az_database_subnet = { "ap-southeast-2a" : "10.0.201.0/24", "ap-southeast-2b" : "10.0.202.0/24", "ap-southeast-2c" : "10.0.203.0/24" }
Re-open main.tf and add the Terraform subnet resources. We are using the resource meta-argument
for-each.
It will provision an AWS subnet resource multiplied by the number of items in the map variables var.az_public_subnet,
var.az_private_subnet, and var.az_database_subnet, creating a total of 9 subnets.
# Public Subnet
resource "aws_subnet" "public_subnet" {
  for_each = var.az_public_subnet

  vpc_id = aws_vpc.main.id

  availability_zone = each.key
  cidr_block        = each.value

  tags = {
    Name = "my-public-subnet-${each.key}-${terraform.workspace}"
    Tier = "public"
  }
}

# Private Subnet
resource "aws_subnet" "private_subnet" {
  for_each = var.az_private_subnet

  vpc_id = aws_vpc.main.id

  availability_zone = each.key
  cidr_block        = each.value

  tags = {
    Name = "my-private-subnet-${each.key}-${terraform.workspace}"
    Tier = "private"
  }
}

# Database Subnet
resource "aws_subnet" "database_subnet" {
  for_each = var.az_database_subnet

  vpc_id = aws_vpc.main.id

  availability_zone = each.key
  cidr_block        = each.value

  tags = {
    Name = "my-database-subnet-${each.key}-${terraform.workspace}"
    Tier = "database"
  }
}
You may run terraform apply at this point to incrementally update our environment.
$ terraform apply -var-file=env/dev/vpc.tfvarsElastic IP Address and NAT Gateway
EC2 instances provisioned in the private subnet might need to connect to the public internet.
A NAT Gateway allows these instances in
the private subnet to initiate outside connection to the internet, or other external AWS services.
Add these resources to main.tf.
# EIP
resource "aws_eip" "nat" {
  vpc        = true
  depends_on = [aws_internet_gateway.gw]
}

# NAT Gateway
resource "aws_nat_gateway" "gw" {
  allocation_id = aws_eip.nat.id
  subnet_id     = aws_subnet.public_subnet[var.ec2_instance_az].id
}
Route Table and Route Table Association
Now that we have all AWS resources defined for our VPC, it’s time to connect them all together using a route table.
A route table contains a set of rules, called routes, that are used to determine where network traffic from your subnet or gateway is directed.
Open main.tf and add these resources.
# public subnet route table
resource "aws_route_table" "public_subnet_route_table" {
  vpc_id = aws_vpc.main.id

  route {
    cidr_block = "0.0.0.0/0"
    gateway_id = aws_internet_gateway.gw.id
  }

  tags = {
    Name = "my-public-subnet-route-table"
  }
}

# public subnet route table association
resource "aws_route_table_association" "public_subnet_route_table_association" {
  for_each = var.az_public_subnet

  subnet_id      = aws_subnet.public_subnet[each.key].id
  route_table_id = aws_route_table.public_subnet_route_table.id
}

# private subnet route table
resource "aws_route_table" "private_subnet_route_table" {
  vpc_id = aws_vpc.main.id

  route {
    cidr_block = "0.0.0.0/0"
    gateway_id = aws_nat_gateway.gw.id
  }

  tags = {
    Name = "my-private-subnet-route-table"
  }
}

# private subnet route table association
resource "aws_route_table_association" "private_subnet_route_table_association" {
  for_each = var.az_private_subnet

  subnet_id      = aws_subnet.private_subnet[each.key].id
  route_table_id = aws_route_table.private_subnet_route_table.id
}

# database subnet route table
resource "aws_route_table" "database_subnet_route_table" {
  vpc_id = aws_vpc.main.id

  route {
    cidr_block = "0.0.0.0/0"
    gateway_id = aws_nat_gateway.gw.id
  }

  tags = {
    Name = "my-database-subnet-route-table"
  }
}

# database subnet route table association
resource "aws_route_table_association" "database_subnet_route_table_association" {
  for_each = var.az_database_subnet

  subnet_id      = aws_subnet.database_subnet[each.key].id
  route_table_id = aws_route_table.database_subnet_route_table.id
}
Run terraform apply. Open the AWS Console and verify if these resources were properly provisioned.
You should see 3 route tables: a public, private, and database route tables.
Each route table should be associated to 3 subnets. Here’s mine.

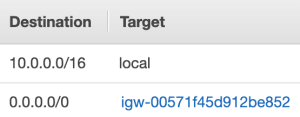
Public route table with 3 public subnets associated

Public route table route destination. Non-local traffic is routed to the Internet Gateway.
Private and Database route table route destination. Notice that the non-local traffic is routed to the NAT Gateway instead of the Internet Gateway.

Spinning up AWS EC2 instances
The last step is to create an EC2 instance in the public subnet, which will serve as our bastion host.
First, open variables.tf and add the map variable declaration below.
variable "ec2_instance_az" {
  type = string
}
Open env/dev/vpc.tfvars and set the key-value pair for the DEV workspace. This will be used to specify which
public subnet availability zone we will provision the EC2 instance.
ec2_instance_az = "ap-southeast-2a"Next is to create a key pair to connect to the EC2 instance. Create it manually by following the steps
in the AWS documentation.
Use the Sydney region for our DEV workspace. Take note of the key pair name.
Create a new file server.tf and add the script below. Replace the key_name = "my-keypair" value with your
key pair name from the previous step.
data "aws_ami" "ubuntu" {
  most_recent = true

  filter {
    name   = "name"
    values = ["ubuntu/images/hvm-ssd/ubuntu-bionic-18.04-amd64-server-*"]
  }

  filter {
    name   = "virtualization-type"
    values = ["hvm"]
  }

  owners = ["099720109477"] # Canonical
}

resource "aws_security_group" "bastion_host_sg" {
  name   = "bastion_host_sg"
  vpc_id = aws_vpc.main.id

  ingress {
    from_port = 22
    to_port   = 22
    protocol  = "tcp"

    // Not the safest thing to do, but you can replace
    // this with your public IP address - x.x.x.x.x/32
    cidr_blocks = ["0.0.0.0/0"]
  }

  egress {
    from_port   = 0
    to_port     = 0
    protocol    = "-1"
    cidr_blocks = ["0.0.0.0/0"]
  }

  tags = {
    Name = "my-bastion-host-security-group"
  }
}

resource "aws_instance" "bastion_host" {
  ami           = data.aws_ami.ubuntu.id
  instance_type = "t3.micro"

  subnet_id                   = aws_subnet.public_subnet[var.ec2_instance_az].id
  associate_public_ip_address = true
  key_name                    = "my-keypair"
  vpc_security_group_ids      = [aws_security_group.bastion_host_sg.id]

  tags = {
    Name = "My Bastion Host"
  }
}
In the script above, we used a Terraform data source aws_ami. A data source is a read-only representation of a pre-existing data, in this case, the Ubuntu AMI from Canonical.
We also used an EC2 security group and EC2 instance.
Run terraform apply to create the EC2 instance.
$ terraform apply -var-file=env/dev/vpc.tfvarsConnect to your instance and ping amazon.com.

Terraform Output
A convenient way to display important details of the provisioned resources is using
Terraform output. Open outputs.tf
and add the codes below.
output "my-aws-instance-public-ip" {
  value = aws_instance.bastion_host.public_ip
}
This will get the public ip address of the EC2 instance bastion host.
$ terraform output
my-aws-instance-public-ip = 3.105.229.143
Removing Terraform-managed resources
DO NOT SKIP THIS STEP! Terminate all created resources to stop your account from incurring charges.
Destroy all created resources in the DEV workspace.
$ terraform workspace select dev
$ terraform destroy -var-file=env/dev/vpc.tfvars
If you used the other workspaces, then make sure you destroy it all too.
# UAT
$ terraform workspace select uat
$ terraform destroy -var-file=env/uat/vpc.tfvars

# PROD
$ terraform workspace select prod
$ terraform destroy -var-file=env/prod/vpc.tfvars
Project Codes
Download the complete codes in https://github.com/carlocayos/terraform-vpc-tutorial.
What’s Next?
When creating the VPC using Terraform, it is apparent there are a lot of boilerplate codes. This can be simplified by using a third party Terraform AWS VPC module. In the next and final post, we will see how we can use the module to simplify the AWS VPC creation using Terraform.
