Terraforming an AWS VPC Part 2

Table of Contents
This is the second part of a series of articles on how to setup an AWS VPC using Terraform version 0.12.29.
In Part 1 of this series of post, we have created our first Terraform project and ran basic commands to generate an execution plan, and then provision our first AWS VPC. In this follow-up post, we will continue on updating our script to complete our VPC.
Remote State
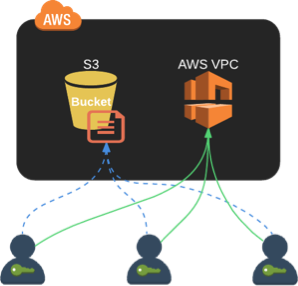
By default, Terraform saves the state file terraform.tfstate locally. Remember that the state file keeps a record of your infrastructure. If several users are updating the same environment, then each user would generate a state file locally. Any modification done in the code would not be visible to other users. Fortunately, Terraform supports remote state storage.
In the image above, the state file is saved to an S3 bucket and is shared across all users. A team member with proper IAM credential can access the state file and update it through Terraform as it will know which resource has been modified, added, or destroyed.
Update the main.tf file to configure Terraform to save the state file to S3.
#-------------------------------
# AWS Provider
#-------------------------------
provider "aws" {
  region  = "ap-southeast-2"
}

#-------------------------------
# S3 Remote State
#-------------------------------
terraform {
  backend "s3" {
    bucket = "my-terraform-bucket-12345"
    key    = "vpc.tfstate"
    region = "ap-southeast-2"
  }
}

#-------------------------------
# VPC resource
#-------------------------------
resource "aws_vpc" "main" {
  cidr_block = "10.0.0.0/16"

  tags = {
    Name     = "my-terraform-aws-vpc"
  }
}
This tells Terraform to save the state file into an S3 bucket rather than storing it locally. Set a unique name to
your S3 bucket name, and make sure that the IAM credentials you are using have access to this bucket. Now run
terraform init then terraform apply. A new vpc.tfstate file should be uploaded to your S3 bucket.
$ terraform init
Initializing the backend...
Successfully configured the backend "s3"! Terraform will automatically use this backend unless the backend configuration changes.
...
Terraform Workspace
The ability to reproduce your infrastructure for any environment, in any region, with just running a few commands, is one of the key features of Terraform. It’s ideal to have this in mind when designing our scripts before we move further and write more lines to our code. Terraform supports multiple workspaces to provision different configurable environments requiring similar resources.
Run terraform workspace list, it will show us the list of all workspaces.
$ terraform workspace list
* default
As expected, we only have the default workspace in the list, and it is the currently selected workspace as indicated
by the asterisk *. What we want is to create a VPC for these environments:
- DEV
- UAT
- PROD
Let’s create a new workspace by running terraform workspace new dev.
$ terraform workspace new dev
Created and switched to workspace "dev"!
You're now on a new, empty workspace. Workspaces isolate their state, so if you run "terraform plan" Terraform will not see any existing state for this configuration.
$ terraform workspace list
  default
* dev
We are automatically migrated to the new dev workspace. Do the same for uat and prod workspaces.
View the remote S3 bucket to see how Terraform stores separate state files for these 3 environments.
$ aws s3api list-objects --bucket my-terraform-bucket-12345 --query 'Contents[].{Key: Key}'
[
    {
        "Key": "env:/dev/vpc.tfstate"
    },
    {
        "Key": "env:/prod/vpc.tfstate"
    },
    {
        "Key": "env:/uat/vpc.tfstate"
    },
    {
        "Key": "vpc.tfstate"
    }
]
There are 3 newly created state files, each one persisting an environment’s state. We can ignore the vpc.tfstate in the root directory as this was created in the default workspace. It is preferred to use the workspace state file for multiple environments.
Change back to the dev workspace using the command terraform workspace select dev and create a VPC in this new
environment. Follow the same procedure for the uat and prod workspace.
$ terraform workspace select dev
Switched to workspace "dev".
$ terraform plan
...
$ terraform apply
...
Configurable Environment
Different environments have different need. A production environment needs more compute power than a development environment. You also need to consider the location where you provision your environment. For example, if your development team is in Australia, your testers are in Singapore, and your clients are in Japan, then you should build your infrastructure closest to who will be using it, it will lower latency and cost.
To achieve this, we need to modify our script and add variables. Let’s first start by using variables to set the AWS region where we will provision our VPC, the VPC CIDR block, and resource tag.
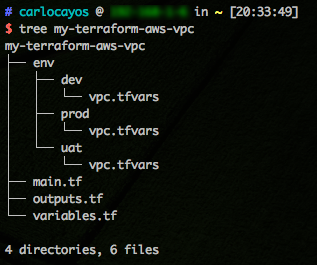
Your project should have main.tf and variables.tf files. Create a new directory env, under it create the
subdirectories dev, uat, and prod. In each subdirectory, create a file vpc.tfvars to hold all the
variable values distinct to each environment.
Set the variables values for each environment. The VPC CIDR block would remain the same for simplicity.
env/dev/vpc.tfvars — Asia Pacific (Sydney) region
aws_region     = "ap-southeast-2"
vpc_cidr_block = "10.0.0.0/16"
env/uat/vpc.tfvars - Asia Pacific (Singapore) region
aws_region     = "ap-southeast-1"
vpc_cidr_block = "10.0.0.0/16"
env/prod/vpc.tfvars - Asia Pacific (Tokyo) region
aws_region     = "ap-northeast-1"
vpc_cidr_block = "10.0.0.0/16"
Open variables.tf and define the following variables.
variable "aws_region" {
    description = "AWS Region"
}
variable "vpc_cidr_block" {
    description = "Main VPC CIDR Block"
}
Go to main.tf file and use these variables in this format ${var.variable_name}.
#-------------------------------
# AWS Provider
#-------------------------------
provider "aws" {
  region  = var.aws_region
}

#-------------------------------
# S3 Remote State
#-------------------------------
terraform {
  backend "s3" {
    bucket = "my-terraform-bucket-12345"
    key    = "vpc.tfstate"
    region = "ap-southeast-2"
  }
}

#-------------------------------
# VPC resource
#-------------------------------
resource "aws_vpc" "main" {
  cidr_block = var.vpc_cidr_block

  tags = {
    Name = "my-terraform-aws-vpc-${terraform.workspace}"
    Environment = terraform.workspace
  }
}
The variable ${terraform.workspace} is an interpolation sequence to get the current workspace name to set in our configuration.
Update the dev environment by setting the correct workspace, running terraform plan and terraform apply while
using the attribute var-file to tell Terraform which values to substitute to the variables.
$ terraform workspace select dev
...
$ terraform plan -var-file=env/dev/vpc.tfvars
...
$ terraform apply -var-file=env/dev/vpc.tfvars
...
Do the same for uat and prod, by changing the vpc.tfvars location. Go to your AWS console, select the region and search for the created VPC.
# For UAT
$ terraform workspace select uat
$ terraform plan -var-file=env/uat/vpc.tfvars
$ terraform apply -var-file=env/uat/vpc.tfvars

# For PROD
$ terraform workspace select prod
$ terraform plan -var-file=env/prod/vpc.tfvars
$ terraform apply -var-file=env/prod/vpc.tfvars
Completing the VPC 🏁
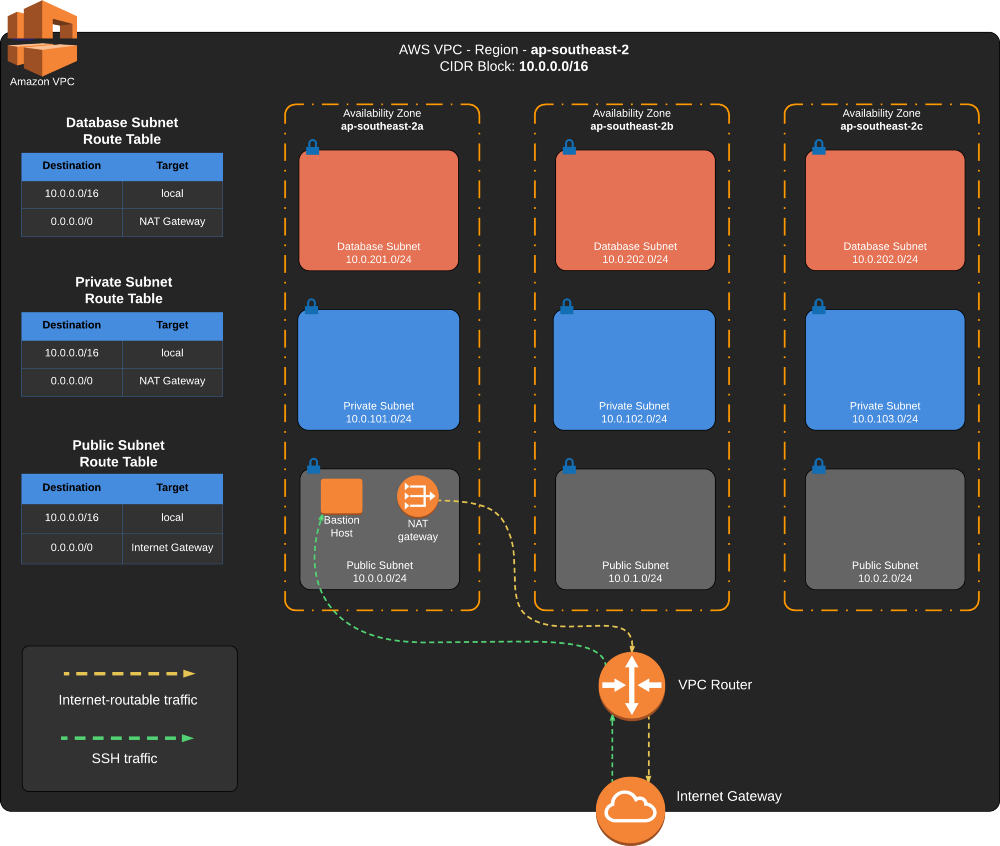
We have set up a remote state file and made the code reusable for different environments, it’s time to finish up our VPC in Part 3. In order to do this, we will be adding these resources:
- AWS VPC (done)
- Internet Gateway
- 3x Public subnet — one for each AZ
- 3x Private subnet — one for each AZ
- 3x Database subnet — one for each AZ
- Public subnet route table
- Private subnet route table
- Database subnet route table
- EC2 Bastion Host
- Elastic IP Address
- NAT Gateway
The diagram below shows us how we want to setup the VPC.


