Terraforming an AWS VPC Part 1
Table of Contents
This is part 1 of a series of articles on how to setup an AWS VPC using Terraform version 0.12.29.
Imagine you will be working on a greenfield project where everything will be running in AWS. Because you have watched more AWS tutorial videos than anyone else in your team, you were given the responsibility to set up all the needed AWS resources. Everyone in the team is blocked until you complete it. But you don’t feel any pressure at all because according to one of the tutorial videos you watched, hosting your servers in AWS is child’s play and can be done in a click of a button.
When you sat on your desk, the first thing you did is login to the AWS console and started building an AWS VPC. You have managed to setup the VPC, along with an internet gateway and a public subnet in all Availability Zones. Later that week, a developer said that another application will be exclusively used internally, so you created a private subnet for internal apps. Updates from the team kept on coming, and you handled it like a pro, thanks to the tutorial videos and a few button clicks in the AWS console.
Now, a tester came to you asking for a UAT environment, and pointed out that it should be exactly similar to the DEV environment. You paused for a second and tried thinking of what needs to be done. You realised that not only you have to recall and probably watch all the tutorial videos again to do all the incremental changes you’ve made, you also have to verify if the UAT environment you created is a mirror copy of the DEV environment as per requirement.
Infrastructure as Code
Infrastructure as code is a technique for provisioning infrastructure configuration by means of codes. It allows you to control and implement changes to your environment through code changes pushed into a source repository, resulting to a more maintainable and predictable infrastructure.
Terraform is an IaC open source software written in Golang by Hashicorp.
Terraform is a tool for building, changing, and versioning infrastructure safely and efficiently. Terraform can manage existing and popular service providers as well as custom in-house solutions.
The key features of Terraform are:
- Infrastructure as Code
- Execution Plans
- Resource Graph
- Change Automation
Terraform is agnostic to the underlying platform, it has providers which drives the API interaction to different IaaS, PaaS, or SaaS services. For this article, we will be using Terraform’s AWS Provider.
Installing Terraform
For macOS users, install Terraform using Homebrew. Check the version to confirm if it is installed correctly.
$ brew install terraform
$ terraform -version
Terraform v0.12.29
Terraform Hands-on
First, make sure that you have AWS credentials with access to provision resources to your AWS account. The easiest way
to do this is installing AWS CLI and running the command aws configure.
Let’s create our first Terraform project. Create a new directory, then inside it create three empty files.
my-terraform-aws-vpc
├── main.tf
├── outputs.tf
└── variables.tf
Open main.tf file and add these codes.
1 | |
This tells Terraform to configure an AWS provider and set the AWS region to Sydney (ap-southeast-2). It will also create an AWS VPC with a CIDR block of 10.0.0.0/16.
In your terminal, go inside the created directory and run terraform init. This will download and initialise the AWS provider set in your main.tf file.
$ terraform init
Initializing the backend...

Initializing provider plugins...
- Checking for available provider plugins...
- Downloading plugin for provider "aws" (hashicorp/aws) 2.70.0...
...
Terraform has been successfully initialized!
Run terraform plan and see what happens!
$ terraform plan
...
An execution plan has been generated and is shown below.
Resource actions are indicated with the following symbols:
  + create

Terraform will perform the following actions:

  # aws_vpc.main will be created
  + resource "aws_vpc" "main" {
      + arn                              = (known after apply)
      + assign_generated_ipv6_cidr_block = false
      + cidr_block                       = "10.0.0.0/16"
      + default_network_acl_id           = (known after apply)
      + default_route_table_id           = (known after apply)
      + default_security_group_id        = (known after apply)
      + dhcp_options_id                  = (known after apply)
      + enable_classiclink               = (known after apply)
      + enable_classiclink_dns_support   = (known after apply)
      + enable_dns_hostnames             = (known after apply)
      + enable_dns_support               = true
      + id                               = (known after apply)
      + instance_tenancy                 = "default"
      + ipv6_association_id              = (known after apply)
      + ipv6_cidr_block                  = (known after apply)
      + main_route_table_id              = (known after apply)
      + owner_id                         = (known after apply)
      + tags                             = {
          + "Name" = "my-terraform-aws-vpc"
        }
    }

Plan: 1 to add, 0 to change, 0 to destroy.

------------------------------------------------------------------------

Note: You didn't specify an "-out" parameter to save this plan, so Terraform
can't guarantee that exactly these actions will be performed if
"terraform apply" is subsequently run.
Notice that it generates an execution plan with 1 VPC resource to be added. The command terraform plan is a way to see an overview of what resource will be added, changed, or destroyed in relation to the code changes, without applying the changes to your infrastructure.
After reviewing the execution plan, it’s time to implement it by the conveniently named command terraform apply.
$ terraform apply
...
Plan: 1 to add, 0 to change, 0 to destroy.

Do you want to perform these actions?
  Terraform will perform the actions described above.
  Only 'yes' will be accepted to approve.

  Enter a value: yes

aws_vpc.main: Creating...
aws_vpc.main: Creation complete after 3s [id=vpc-00b4438c67901c9cd]
Apply complete! Resources: 1 added, 0 changed, 0 destroyed.
Login to the AWS console to view the created VPC or run this AWS CLI command.
$ aws ec2 describe-vpcs --filters 'Name=tag:Name,Values=my-terraform-aws-vpc'To demonstrate how easy it is to spin up your infrastructure via Terraform, we will destroy the created VPC using the command terraform destroy.
$ terraform destroy
...
Terraform will perform the following actions:
  # aws_vpc.main will be destroyed
Plan: 0 to add, 0 to change, 1 to destroy.

Do you really want to destroy all resources?
  Terraform will destroy all your managed infrastructure, as shown above.
  There is no undo. Only 'yes' will be accepted to confirm.

  Enter a value: yes

aws_vpc.main: Destroying... [id=vpc-00b4438c67901c9cd]
aws_vpc.main: Destruction complete after 0s
Destroy complete! Resources: 1 destroyed.
Then build it again using terraform plan and terraform apply.
State File
Terraform saves the state in a terraform.tfstate file in JSON format, this file contains the managed infrastructure details.
my-terraform-aws-vpc
├── main.tf
├── outputs.tf
├── terraform.tfstate
├── terraform.tfstate.backup
└── variables.tf
Here’s how it looks like.
{
  "version": 4,
  "terraform_version": "0.12.29",
  "serial": 5,
  "lineage": "62ac4f4b-b60a-2ca0-364a-3e8fcad74c66",
  "outputs": {},
  "resources": [
    {}
  ]
}
By default, the state file is saved locally. However, when working in a team, this should be saved in a remote location to have a synchronized state across all terraform users.
What’s next?
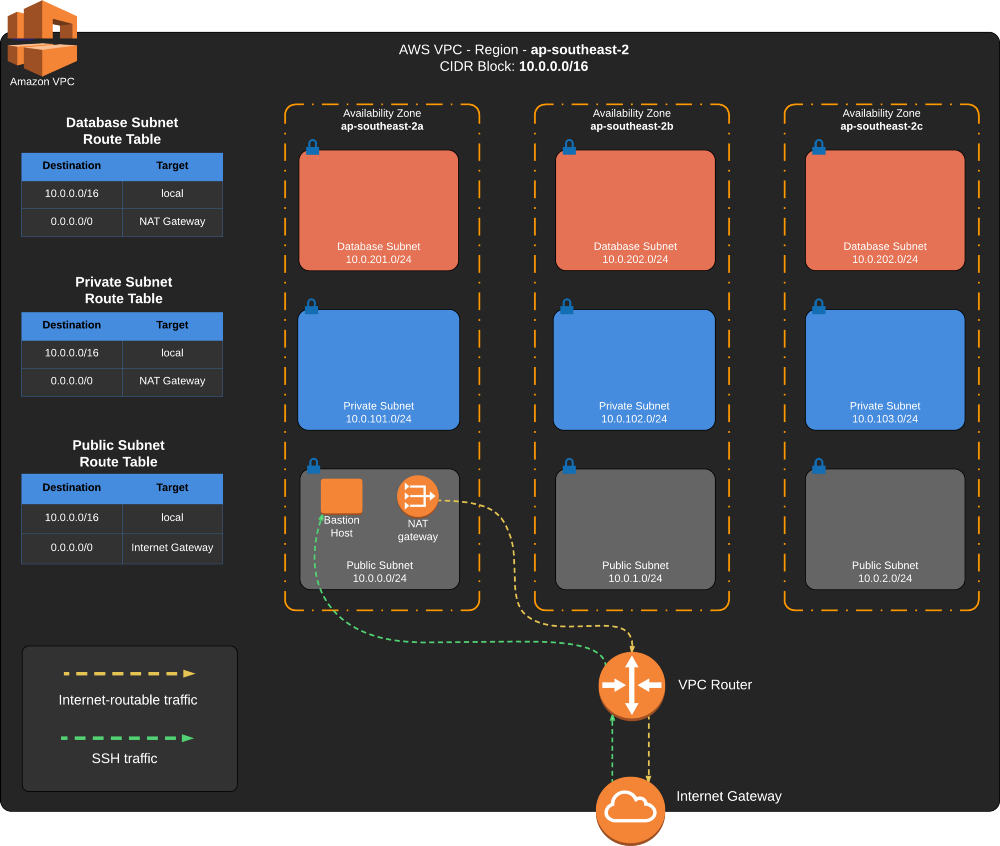
We are now familiar on how Terraform works and have created an AWS VPC, but the VPC is still missing critical components to make it useable. In the second part of this blog post, we would transfer the state file into a remote S3 bucket, discuss how to re-use the code to create multiple environments, and update the Terraform script to complete the VPC setup as depicted in the diagram below.